23 April 2008

Drawing Examples


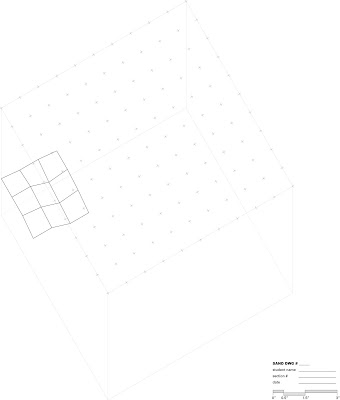
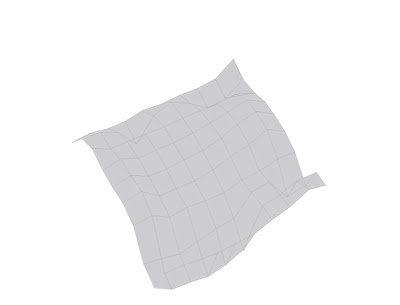
To construct this drawing, I shaded the surface a very light gray to further distinguish surface from object. You may do this, but it is not a requirement.

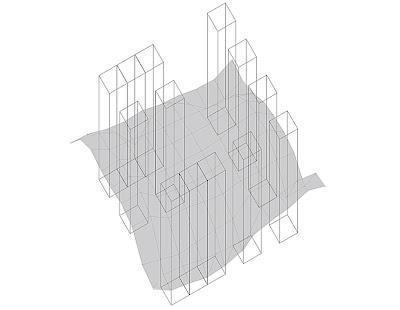
Draw your 13 boxes and place them in your grid. To do this I actually turned off the surface layer and used the original "21 by 21 Regulating Lines" layer to accurately place them in space. To draw the boxes I simply drew a 2 by 2 box and moved a copy up 10 inches and connected the lines. After you are done studying the boxes in space and carefully creating your path space and your subsequent place space, turn the surface back on and the regulating grid off to see what you have.


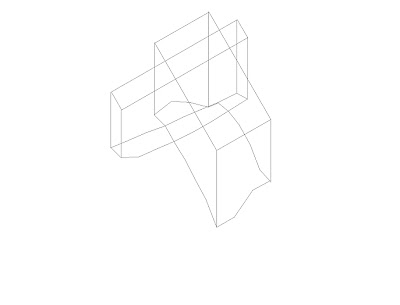
Draw the path space and the place space that your boxes create. To do this you will need to lock all layers and create a new layer labeled Forms. You will be using the top box edge to regulate and draw what spaces were created from these objects. Turn on the Drop Lines Layer and select the edges of the lines where the intersections of the form are created (see above). Copy those lines and move them to a new layer (you can refer to the attached drawing at the end of this post), turn off the Drop Lines layer and change the linetype of the new linetype. You will have the tops and the sides after these steps. To create the North and South and East and West connections use the Work Layer Profile layers and select the lines that intersect and follow the bottom edge of your form and copy and paste that into a new layer. Now turn off your box object layer and view the forms created by the boxes with the wire surface.


Turn off all surface layers and print your final forms of space.

Here is the ai file :: 1412_Sp08_XXX_Sandbox_100ptWork_1to1scale_Space.ai
Here is a dwg file :: 1412_Sp08_XXX_Sandbox_100ptWork_1to1scale_Space.dwg
Here is a dxf file :: 1412_Sp08_XXX_Sandbox_100ptWork_1to1scale_Space.dxf

(take note of the new layers in the drawing)

22 April 2008

17 April 2008

Baroque Wireframe

l’unanime pli - one CONTINUOUS surface, fabric, -scape, or -scope.
Gilles Deleuze in THE FOLD: Leibniz and the Baroque

considerations

These continuous surfaces appeared as ontologically quantified and studied conditions in the 17th and 18th centuries by philosophers and mathematicians such as Leibniz and Descartes (Calculus is a mathematics based on the potential of a continuous fold and topological notions of space and measure). These studies paralleled and influenced the development of Baroque architecture- an architecture responsible to the ability to project within complex surface. The importance of the fold (including conceptual folding and material folds) may have emerged with the Baroque but it has remained an issue in artists (such as Paul Klee), poets (such as Mallarme), and musicians (Berlioz). In the last 20 years folding in architecture has become a common thread in many academic and professional studios. This renaissance of the fold as a key intellectual and technological development in architectural production is chronicled across four texts. In 1988 the philosopher Gilles Deleuze published the book
THE FOLD: Leibniz and the Baroque and refocused the importance of the fold in critical thinking and practice. In the same year Avrum Stroll wrote of the notion of geometric descriptions rooted in everyday geometries of surface in his book SURFACES. In 1993, FOLDING IN ARCHITECTURE, a collection of essays edited by Greg Lynn was published. In 1995 Bernard Cache published EARTH MOVES: the Furnishing of Territory, in 2003 Sophia Vyzoviti published FOLDING ARCHITECTURE: Spatial, Structural, and Organizational Diagrams. These five sometimes opaque and difficult texts make up a backbone of teaching through folding.

The exercise returns to wire. We’ll use wire to execute this exercise. You’ll need just over 220 feet of it. You can use the wire you already have on hand. The most successful work overall this semester was done with wire. Reconsider the ways you developed in working with wire and let the metal craft of the project be a major part of your projections.

method

• Take four high resolution digital photographs, using a one strong light, of the existing surface in your sandbox. The light should be evenly dispersed and create intense interior shadows. Print it out and pin these images up each as a 6”x6” black and white print on 8.5 bt 11 inch (letter) white paper on your wall. Put your name and section # on the back of each sheet. Name the .tif photo files “1412_sp08_XXX_ExF_Photo0X.tif” where XXX is your initials and Photo0X is the photo number (1 through 3).
• Study the graphics and database you’ve developed to complete the new 441 point drawing of the sand and hose surface. Discern the dominant inflections and facets described in the drawing. Write this down or sketch it out for your reference.
• Translate the spatial and superficial contents of the 441 drawing into a well crafted 121 by 121 mesh made of wire. This should be a simplified material translation of a full scale model of the sand surface projected in your 441 drawing- nothing else. The strands of wire should be arranged in a 2 inch by 2 inch grid with a perimeter of 20 inches by 20 inches. There should be nothing but mesh- do not make external elements to prop or hold the mesh.

This wire mesh model will become the site for the rest of the semester’s design work. Prepare it well and consider the intersections and specificity of your material design. You will be asked to add cubic and cylindrical elements to this model as we progress.

15 April 2008

Retaining the Sand Surface

For Thursday you need to rework the surface in your box using dry sand, nylon, and string. Today we saw the nylons being used as retaining walls, bags, and hammocks. The hammock technique is not working because although we are using two materials, the sand is still one singular surface and we should read it as such. You can use the hammock method, but it should be partially submerged, this will still read as a single surface. The "hammock" when suspended in air reads as two surfaces. Exploit your box, use the string and the nails on the box, they are there for several reasons. The surface should be a translation of what was in your box either in version one or in version two. The second surface you had in your box was due las Thursday, this is the preferable surface to translate with the hose. As a reminder the assignment last week was to change the view or frame and recreate the surface again and draw it again. The assignment for today was to directly interpret the surface of the sand without the use of water. We are looking for a correlation between surfaces. So using the nylon and the string how can you manipulate your sand to look like your prior surface? Some of you are having trouble because your sand is not drying. Either put it in front of a window or transport the wet sand to the outdoors and replace your sand with dry sand. Dispose of your sand responsibly!

The new surface is due on Thursday along with a drawing including all of the 441 points of the grid. This is a big assignment so you should start right away. Take a picture of the final surface and print it as a 6x6 for Thursday, the sand should be smooth, make it pretty. The drawing instructions are below:

Goal:

To log & construct a plan oblique graphical representation of the surface of your dry sand plus pantyhose sandbox using only lines. The drawing is of the sand and not the pantyhose.

Procedure:
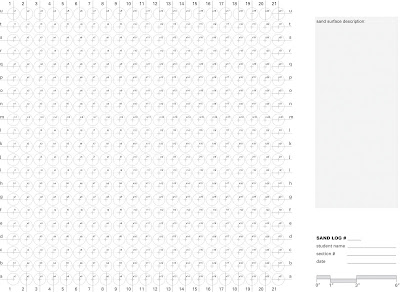
1) Download & print the pdf file "1412_Sp08_XXX_SandBox_441ptLog.pdf" on 11 by 17 paper in landscape format & "fit to print". The outcome should look close to this:
2) First write a description of the surface(s) in your sandbox in superficial & formal terms in the given space on the printed out log sheet. Use the terms we've started talking about in everyday geometries. Describe hierarchies, alignments, & other relationships / differences in surface quality. Describe the construction of the nylon and what forces are being performed to manipulate the surface of the sand.

3) Wrap the string around every nail to create the complete measuring grid with string. Now in your sandbox measure the height of the 441 pts indicated on the given graph & log each of them in pencil in the corresponding circle on your printed out log sheet. Keep this paper log. Pin it up over your box. It will be a part of your grade.

4) We recommend you use Illustrator for this assignment if you have it but you can do the work in a CAD application too. These instructions will try to remain "neutral" but the CAD files may have some distortions and layer changes in them. All work was done in Illustrator.
For CAD: Download & open the DWG file "1412_Sp08_XXX_Sandbox_441ptWork.dwg".
Also for CAD: Download & open the DXF file "1412_Sp08_XXX_Sandbox_441ptWork.dxf".
For Illustrator: Download & open the AI file "1412_Sp08_XXX_Sandbox_441ptWork.ai".
You should have fewer problems than before with this drawing:

5) With the file open get familiar with all the layers, lineweights, & linetypes. You will draw in the work layers. The layers have been arranged so that the top three are your work, the next few are the most needed references, & the last few layers are more obscure and non-print references. You should use the layers you did for the 100 pt drawing.

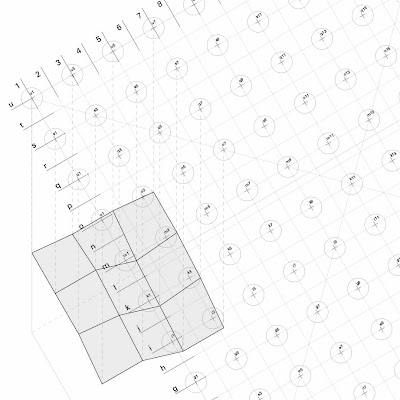
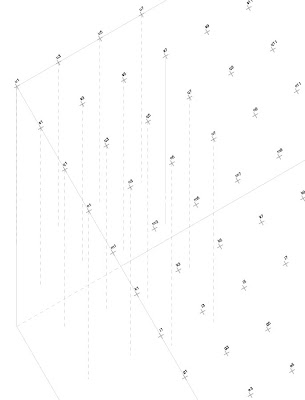
6) Turn on the work layer "Depth Lines". On that layer we've started an example for you to review. You should be familiar with the method so you should just erase the sample. From each grid intersection draw a fine, grayed short dashed line down from the point as long as the sand is deep in the box. You may want to create more layers within the depth lines so you will have Depth A through Depth U. And if you want to be safe create layers for the numbered portions as well, Depth 1 through Depth 21. Since there are 441 points the endpoints will be hard to see. You can turn layers on and off it need be.

7) Turn on the work layer "WorkLayer-ProfileLines_East to West". Along each "east-west" row of depth lines connect the bottom end points of each line with a medium, solid , & black line segment. Turn one layer on at a time and just draw that row, rinse rather and repeat while moving from a to u.

8) Turn on the work layer "WorkLayer-ProfileLines_North to South". On that layer we've started an example for you to review. Once familiar with the method you should erase this sample. Along each "north-south" row of depth lines connect the bottom end points of each line with a medium, solid , & black line segment. Turn one layer on at a time and just draw that row, rinse rather and repeat while moving from 1 to 21.

9) Now turn off the depth lines & the notation so that you have the box, the sand surface, the top level intersections, & the title block. Be consistent with your prior prints.

10) Print it 1/2 scale on the OCE, or one of the large format printers in the print bureau. Pin this drawing up over your sandbox. Again it is important to be consistent with your prior prints.

11) Save the file as a pdf file named "1412_Sp08_XXX_Sandbox_441ptWork.pdf".

This is due on Thursday. You will be marked for completion.

08 April 2008

Pop Assessment

Today we will start lecture class at 6:30PM. This is to allow you a few minutes to address the following matter:
As many of you have noticed there is an incredible disparity between what some of you have accomplished to date on the current project and what some of you have not started and or finished. The disparity is too great. Something has to be done. The number who are keeping up have to be acknowledged and those trailing have to be identified and held to a standard of completion. You all should now have:
a) A finished sandbox with the interior painted white, 50% of the interior filled with sand, a perimeter register of nails and stenciled notation, and your name neatly indicated somewhere on the box. This box should be set up and work in progress in the area in teh building designated for your studio. (Exercise Sandbox A)
b) A "ventilated" (sliced with a knife) image from a domestic interior that has been over-sprayed. A frame should have been affixed on this over-sprayed image that encloses the square on the ventilation you've translated into the sandbox. This model should be pinned or taped up over your sandbox. (Exercise Sandbox B)
c) A translation into the surface of the sandbox of this framed location on your ventilation. (Exercise Sandbox D)
d) A printed out large format drawing as specified in my post on the class webpage. This should be posted above the sandbox. (Exercise Sandbox C & E)
Today, during the lecture course, the TAs will make a grade of what you have done so far on the sandbox project. Below is the grading sheet they will use. This grade will for 5 points of your total semester's 100 points. That leaves the grade for the 20 last studio points and the 12 points left for the final exam.
Please take the first half hour of the lecture class to make sure your space is organized, your name is there, and your work is set up in an orderly manner. We'll start our presentation at 6:30 (18h30) sharp.

The TAs will have this assessment ready for you at the end of class.

Fixed Drawings

Fixed files ::

So here is a dxf : 1412_Sp08_Sandbox_100ptWork_1to1scale_1.dxf

and here is a dwg file :
1412_Sp08_Sandbox_100ptWork_1to1scale_1.dwg

One will work better than the other. If you are using Autocad please try both one will work better than the other, you want the one that transfers lineweights as well as text. This should work now! If you are using Illustrator you should not have any troubles with the files that were posted previously.

XXX is representative of your initials...MLG, BTR, ect. ect. When you are finished downloading re-save the file as 1412_Sp08_XXX_Sandbox_100ptWork.

Have fun....

When you print the large drawing print it at 1/2 scale not full scale on a 24 x 24 sheet. If you had troubles printing this morning do not worry, just make sure it is pinned up on your wall before tonights class. We will be checking and grading so make sure it is there.

Presentations

On Wednesday at 5PM Jennifer Siegel of The Office of Mobile Architecture in Los Angeles will be presenting her work. You all should go. We'll be bringing her through the studios sometime Wednesday. Greet her and talk to her. She does really amazing work and will be impressed by yours if you explain yourselves. She has hired TTU architecture students in the past.

On Thursday at 3PM Chris Taylor, a candidate for the college's Chair of Instruction position, will make a presentation. He is interested in coming to TTU from UT to teach and lead the school. Check him out and put in your two cents on this candidacy. He'll be coming through your studios that morning. Talk to him and show him that students here don't have a boot up their butt like they do at UT.

Class Today

You all will be working in class today. If you do not take advantage of the oportunity we'll not give it again. Keep quiet, work hard, and use your time and TA wisely. Be prepared to work.

07 April 2008

10th Floor Exhibit

We've put up a show of select projects on the 10th floor.
BOUNDING SPACE
DORM ROOM MODELS, INDEXES, & DIAGRAMS
Featured Students:
Jordan Berta
William Cotton
Shane Logains
Peter Longoria
Celeste Martinez
Preston Neumann
Armando Olivera
Jigga Patel
CURRENT WORK FROM ARCH1412 STUDIO ONE : GOTTSCH & REX

Go see it.

1 to 1 Scale Drawing

The drawing that is posted below is at a 1/2 scale so the 20" dimension is at 10 inches so your measurements will be off by 1/2. Some of you are already have discovered this problem.

So here is the Illustrator file : 1412_Sp08_XXX_Sandbox_100ptWork_1to1scale.ai

and here is the dwg file : 1412_Sp08_XXX_Sandbox_100ptWork_1to1scale.dwg

XXX is representative of your initials...MLG, BTR, ect. ect.

Have fun....

06 April 2008

Sandbox Drawing #1

clickable image

Goal:
To log & construct a plan oblique graphical representation of the surface of your sandbox using only lines.

Procedure:
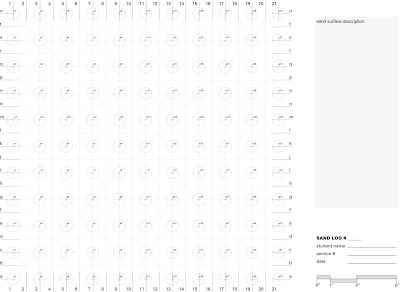
1) Download & print the pdf file "1412_Sp08_XXX_SandBox_100ptLog.pdf" on 11 by 17 paper in landscape format & "fit to print". The outcome should look close to this:

clickable image

2) First write a description of the surface(s) in your sandbox in superficial & formal terms in the given space on the printed out log sheet. Use the terms we've started talking about in everyday geometries. Describe hierarchies, alignments, & other relationships / differences in surface quality.

3) In your sandbox measure the height of the 100 pts indicated on the given graph & log each of them in pencil in the corresponding circle on your printed out log sheet. Keep this paper log. Pin it up over your box. It will be a part of your grade.

4) We recommend you use Illustrator for this assignment if you have it but you can do the work in a CAD application too. These instructions will try to remain "neutral" but the CAD files may have some distortions and layer changes in them. All work was done in Illustrator.
For CAD: Download & open the DWG file "1412_Sp08_XXX_Sandbox_100ptWork.dwg".
For Illustrator: Download & open the AI file "1412_Sp08_XXX_Sandbox_100ptWork.ai".

5) With the file open get familiar with all the layers, lineweights, & linetypes. You will draw in the work layers. The layers have been arranged so that the top three are your work, the next few are the most needed references, & the last few layers are more obscure and non-print references. Here is an image of what layers are in the file in Illustrator. (If your CAD file has messed up layers you should move things to match this set-up.):
clickable image

6) Turn on the work layer "Depth Lines". On that layer we've started an example for you to review. Once familiar with the method you should erase this sample. From each grid intersection draw a fine, grayed short dashed line down from the point as long as the sand is deep in the box. Here's the way this should look:

7) Turn on the work layer "WorkLayer-ProfileLines_North to South". On that layer we've started an example for you to review. Once familiar with the method you should erase this sample. Along each "east-west" row of depth lines connect the bottom end points of each line with a medium, solid , & black line segment. Here's the way this should look: 7) Turn on the work layer "WorkLayer-ProfileLines_North to South". On that layer we've started an example for you to review. Once familiar with the method you should erase this sample. Along each "north-south" row of depth lines connect the bottom end points of each line with a medium, solid , & black line segment. Here's the way this should look:

8) You're done drawing! Turn on all the work layers to see it this way:
9) Now turn off the depth lines & the notation so that you have the box, the sand surface, the top level intersections, & the title block. It will look like this:
10) Print it full scale on the OCE, or one of the large format printers in the print bureau. Pin this drawing up over your sandbox. Your TA can help you with printing during class.

11) Save the file as a pdf file named "1412_Sp08_XXX_Sandbox_100ptWork.pdf". Your TA will show you how to do this in class on Tuesday.

This is due by the end of class on Tuesday. You will be marked for completion.

01 April 2008

Drawing the Sandbox Log (amended)

This drawing should be drawn in CAD or Illustrator or both, if you are brave, at 1:1 scale drawing. Please reference the link below or the image above. Step by step instructions:
a) The first lines to draft are a grid of regulating lines spaced at 1" intervals in both the horizontal and vertical directions on your screen. These lines should not be any different from the hand drawn construction lines you used in your bounding space drawings. They will be very thin 50% gray lines.
b) Draft a 20" by 20" box in a black medium thick line, like the cut lines you drew in your last assignment, to indicate the extents of the sandbox.
c) Draft thick 25% (light) gray short crosses at the regulating line intersections to notate your points.
d) Represent the nails on the box periphery at every 1" as a medium line weight in 50% gray line. This line should be 1-1/2" long and project 1/2" into the sandbox.
e) Draft the circles. The circles should be a .45" radius, black and one line weight thicker than the regulating lines, and centered on the regulating line intersections.
f) Register notation about the perimeter of the box reading left to right as 1 through 21 and a though u from bottom to top on all edges of the box delineation. The font should be bold Helvetica or Arial and be 10pt.
g) Register notation housed in the upper right quadrant of each circle that indicates the particular location in bold 6pt Helvetica or Arial.

You can look at the illustrator file here.

A half scale printout of this drawing on 11" by 17" (or two halves on 8.5" by 11 sheets neatly and discretely taped together) is due at the beginning of class on Tuesday April 1st.

31 March 2008

Sandbox Template

v.2 of the templates is coming out Monday around noon. After Tuesday's class you should paint the templates on the side of your box and set all the nails. Then the box will be complete. The templates have been sent to the laser cutter. They'll work as follows:

30 March 2008

Due Tuesday

Emily Andersen, who made the regulating line drawings of Freeways that are posted below, is working in China on a project for her firm. She dedicated to all of you this photo she took in a mannequin factory. She said it looked like the photos of our studio.For Tuesday: you will have a sandbox with the interior painted white, filled with sand, and the domestic ventilation translated into the surface of the sand; you will have a version of your sandbox log printed out; and you will have the domestic ventilation you've chosen to translate.
See the exercise handouts linked to the left.

It seems you've learned trades already this year.
You all could take up careers shaping mannequins and building cat boxes.

26 March 2008

Materials List

1 stick of 2 by 12 (1.5" by 11.25") by 8' long #1 grade SPF or equivalent
2 pieces of 24 by 24 (nominal) by 3/8" (critical) cheap plywood (BC Fir at PanTex)
200' of white or black kite string (no neons)
Flat white paint to cover the interior of the box with two coats
12 #10 countersink wood screws 2.5" long
2.6 cubic feet of dry fine granule sand (w/ no added binders or debris)
96- 2d (penny) nails (1" long)
A basic wooden ruler

Ordering Plywood

PanTex Wood

116 E 42nd St
Lubbock, TX 79404
(806) 747-2561

This company will take an order for 3/8" by 8' by 4' plywood sheets over the phone with payment by credit card ($21.90 per sheet for "BC Fir") and they will deliver the load to the building for you. You can get 8 people's wood out of one sheet if you're buying one piece per person OR if you all want a lid (recommended) you can get four people out of one sheet. One of you has to call in the order and tell them to deliver to the architecture building. They are prompt and you will have it in the shop without a hassle. GO!

24 March 2008

You should be prepared

We are going to have a clean-up/shop day tomorrow. We will have teams assigned to do different projects around the room. We will have a couple sections on desk cleaning detail, a couple sections cleaning chairs, one section may even mop! It took 46 trash cans to clean that room, so yes you all made quite a mess, so now is the time to finish the cleaning. We promise not to get you too dirty, but you should dress appropriately for class tomorrow. Be ready!

You should also buy a 2" x 12" x 8' piece of lumber and bring it to class tomorrow if possible or we will arrange some trucks to travel to Home Depot or Pan-Tex to retrieve our needed lumber. We will have a couple groups working on building boxes tomorrow. The 2" x 12" will vary in length and price. At Home Depot this piece is 12' long and 17.97 without tax. Stores will sell a 2" x 12" anywhere from 8' in length to 12' in length. You need a piece that is at least 8', do not worry about getting one longer than this. You really need four 24 inch pieces to build your box. We will discuss the box you will be using for the remaining part of the semester at length first thing tomorrow. The interior dimension of the box will be 20" x 20" x 10".

See you tomorrow....

15 March 2008

Michel Rojkind

Michel Rojkind, a leading young designer from Mexico City, visited your studios on Thursday this past week. He had only great things to say about the collective spirit and energy you've accumulated in that studio. Marti and I are going to have a tough time shoveling it all out of there.

Your efforts have challenged a lot of the students in the upper years, have made a few people upset, and has made some of the teachers you'll have in the next few years very excited and positive about teaching you. You've made yourselves known as a class that will meet a challenge. You've made yourselves known as a class that knows how to go about making things.

We had no idea that this would be so messy. We have our work cut out for us.

13 March 2008

12 March 2008

Hand-In Number 2 Guidelines

Anything left in the room over the break will be thrown away. Any tool, past drawing, model, or backpack will be tossed into the trash. We need to clear and clean the studio over the spring break. If you need to leave something in the studio put it in a locker and secure it with a lock.

There will be a marked section location in the hall way for you to turn in your projects. You will turn in your cubic wire model, fiat wire model, section drawings, and your two foam models. Projects not left in the appropriate location will get a zero.

Format for turning in your projects will be as follows : Each of your models should be submitted with a piece of drafting tape affixed on its bottom that clearly displays your name and your section number. No boxes, no bags just place them together, side by side. Your section drawing set should be held together with two small binder clips and then rolled. When you roll your drawings make sure to physically roll to the binder clips, do not start the roll with the binder clips. The roll of drawings should be fully protected by a tube, a piece of paper, or a plastic sleeve. Your name and section number should be clearly displayed on the outside of the roll. This roll will be placed with your models.

If you are turning the projects in tomorrow and not Friday at 8am, then you can just place it at the top of the lockers in the hallway.

08 March 2008

Reminder

It should be foamy in the studio :

Your order of operations for this assignment should be similar to the list below:

cut, glue, dry, sand, sand, sand, sand, sand, sand, sand, sand, spackle, dry, sand, paint, dry, sand, paint, dry, sand, paint, dry, sand, paint, dry, sand, paint, dry, sand, ect, ect. Remember to use two different kinds of sand paper, a medium grit, and a fine grit. The fine grit sand paper will make your model incredibly smooth.

You will have a variety of geometric situations in your foam models. The interstitial model will have some 90 degree angles, your fiat model may as well. A fine grit sanding block will aid you in this dilemma.

Remember, both your fiat model and your interstitial model are due on Thursday.

Here is a more specific operation list:
Glue with tacky glue.
Sand with a medium grit then followed by a fine grit sandpaper.
Spackle any major surface impurities and allow to dry. Then sand your result. You may need to repeat this two or three times.
Now you are ready to paint. You paint layers should be light, do not lather on the white, it will take longer to dry. Allow the layer to dry then sand with a fine grit sandpaper. Then paint again.
You will need to repeat this last step up to ten times.

The result: a beautiful white model as smooth as silk.

27 February 2008

Emily Andersen's Freeway Drawings

Emily is an architect in Manhattan. These drawings are formal and flow analysis from the first part of her design project for architecture integrated into freeway construction. Before she studied architecture she studied studio art and fashion.
Either way, these drawings demonstrate the kinds of connection, craft, and geometricization of a form that we're asking you to construct. They are the geometries of bona fide ribbons of concrete, not fiat blobs of where you occupy the room. The way that the drawing is systematized through graphics of arcs and circles, tangents and radii.


Jack Fowler's Sections Through a Blob Model

Report on Test #1

The test was worth 12 of 100 semester points. With the 25 points for the first third of the studio you've now got 37 of your semester's points. By the time you return from Spring Break we'll have another 25 points graded for you over this current studio work.

Drop day is coming up. It is March 12th. We will notify you if we currently have concerns about your passing the class.

The average grade for Test #1 is very high. Many of you did quite well. There are a few people who got less than half the questions right. It seems as though either you did really well or you did quite bad with just a handful doing poorly.

The bonus was a drawing showing a Component set and Colorado is a state made up of only fiat boundaries.

I just told you some of the answers. We said there'd be no make-up test. If you did not make it to the test then the second test will count for 25 points of your grade. We'll just double the points you earn on that test. The second test will still be cheat sheet based but will include some readings, will still be all multiple choice, but not so easy- I'd expect.

Thanks for being so cooperative in taking the test and, for the most part, doing so well.

24 February 2008

You Will Be Confused

(But It's Normal, and Useful)
Written by Professor Donald Kunze of Penn State University

This course and its pedagogical method produce a commonly reported experience: confusion. Because most general education instructors, as most K-12 teachers, have sought to avoid this response because it produces parent complaints, the experience is, for many people, new. Your past teachers avoided problems, but they deprived you of a particularly productive and enjoyable experience. In exchange for tranquillity, they avoided mentioning anything in the classroom that did not endorse your current idea of reality. And, since for most people this has gone on since kindergarten, general world views don't get much revised from their first inception in childhood. Think about that.

It is hard to determine exactly when teachers became afraid of confusing their students—probably about the same time they decided that many English words were unnecessary and grammar was too obscure to teach, that calculators and computers eliminated the need to learn math, and that no one needed to know what they could look up. But, clearly, this momentous change of policy brought many ancillary changes.

Chief among these was the view that if you don't know something already it is unfair for anyone to ask you to learn it. This is the "endorsement" theory of education, which, briefly stated, has it that the function of teaching is to congratulate students for what they have been brilliant enough to learn themselves, inherit, or already figure out on their own. It includes almost every opinion, every misconception, every mistruth in the belief that there are no truths, everything is relative. The endorsement theory wants to be fair, nice, and happy. It is forgiving of idiocy and congratulates it for being creative. It banishes ignorance by promoting it to the level of a justifiable philosophical position. In contrast, instruction that confuses not only sends out the opposite message, it reverses the whole social paradigm that views formal education as a confirmation and certification process.

There are a limited set of responses within this system of self-congratulation. If one is not confirmed and certified, the question is "why not me?" The answer can only relate to the general unfairness of the system at large, its prejudice, its tendency to favor the middle, the norm. Any confirmation system is very likely to be unfair, but most public institutions strive to be as inclusive as possible, linking certification and confirmation to democratic ideals.

The issue is only indirectly about equality, accessibility, and democracy. Education should be available to all, put in terms that all can use if they need, and ordered so that "glass ceilings" are eliminated. Basically, any willing student should be able to go as far as he or she can go as long as effort is applied.

But, this ideal, when made the basis of educational method, does not work. Accessibility and means are two different things. Therefore, when accessibility is translated into the means of inducing educational experience, the first casualty is the experience of confusion.

This is unfortunate, because most all who have looked at the learning process have recognized that real learning involves a period where ignorance generates a general atmosphere of disorientation. Whether this period is unpleasant or not is a matter of attitude. Athletes training for better performance put up with pain, exertion, and exhaustion because it's necessary in the process of acquiring skills, stamina, and strength. Musicians put up with "plateaus" during which extra practice seems to yield no progress. They know that such long periods of no progress or even decline are required before the next period of rapid improvement.

In more spiritual enterprises, such as Zen meditation or philosophical study, the experience of confusion has been institutionalized. In Zen Buddhism, the student concentrates on "koans" that are puzzles the mind cannot solve. In philosophy, an analagous process forms around "aporia" (puzzles), "anomalies," and "paradox." Questions in philosophy are not the kind that have answers that philosophers are just to stupid to answer. They are issues that are invisible to us because of our human constitution, our mental and cultural nature. We can make "progress" in the face of these questions not by "answering" them, but by finding new ways to ask them. When philosophers contemplate such questions, confusion is not an indication that something is wrong but a clue that one is really thinking.

Some philosophers have regarded confusion with such respect that they have made it the center of their idea of truth. Plato cultivated confusion in the dialogs by having Socrates demolish various points of view that, on the surface, seemed reasonable. Nicholas of Cusa developed the idea of "learned ignorance." Giambattista Vico emphasized that rational thought could only go so far, that it was necessary for the thinker first to expect to know completely only what human beings had created and, then, only by considering how all humans shared a common nature capable of creating infinite diversity.

Confusion in the thought process is not to be confused with unpleasant states induced by other means. One can be frustrated by unreasonable expectations. One can be dominated by illusions. One can experience personal problems, schedule overloads, emotional crises. These can all create confusion, but they are not educational. Educational confusion is created in the process of the search for the true. Educational confusion is sometimes momentary, sometimes permanent. It prevents forward motion, but it opens up turns and twists that were formerly invisible.

The popular humorist of the 30's and 40's, Will Rogers, once said that it's not what we don't know that hurts us as much as what we do know that ain't so. Just so with confusion. When we are confident that we know something, we are happy until that confidence is overturned. Then we are confused, but we are on the road to repairing misconception. Every important educational experience involves at least some bit of this process.

The problem with confusion is that students have grown so used to avoiding it, that they immediately project the problem onto some external cause. Their confusion is someone's "fault," someone not themselves. This is to avoid the embarrassment of being confused. Embarrassment is guilt associated with the social use of non-confusion as a substitute for inclusion. If you aren't confused, you are accepted by the group, included, confirmed, certified. If you are confused, you're being thrown out.

Just the reverse is the case in studio. Being confused is one indication that you are a part of the group. Everyone is confused, everyone, that is, if things are going well. Confusion, like pain during athletic training, is an indication that you're getting stronger.

This is not to say that other, non-educational and potentially destructive forms of confusion don't occur. They do, and careful attention has to be given to make sure students aren't just suffering from personal forms of confusion. But, since the main ideas of the course call for the Good Confusion of real learning, the first sign of improvement is confusion.

What To Do When Confused

Because confusion has been nearly eliminated from public education, its productive use has fallen into decay. We don't know what to do except express alarm at our discomfort. Educational confusion calls for definite steps.

THE FIRST STEP. Confusion is uncomfortable, and the point is that our minds are telling us to look for some resolution. Only one thing will provide the kind of intellectual pleasure that is the antidote to educational confusion, and that is "the true," which is somewhat different from "truth." "The true" is a realization that is experienced personally in ways that are self-confirming. It is more of a guide to interpretation of experience than the facts of experience, an adjustment of attitude. The move towards "the true" has to do with wit, insight, and making connections.

THE SECOND STEP. Confusion can be cured only by taking an active role in one's own learning. Nothing that someone else gives you can be trusted entirely. It has to be tested in the laboratory of one's own experience. When a learner decides to be responsible for his/her own actions and plans, when an open attitude is adopted, when the possibility of past error and false presuppositions has been admitted, the "pupil" becomes a "student," as the Romans used to say. You're responsible for your own progress. You teach yourself, for the most part (the ideal of "autodidaction").

THE THIRD STEP. Being responsible for your own learning doesn't mean that you isolate yourself and listen to no one else. Self-learning inevitably involves collaboration and sympathy. Once you find out that no one can tell you what is right, you realize that all truths are shared. Other points of view are always informative. Everyone has something to teach. Confusion is overcome when one gains the confidence to teach one's self by periodically abandoning all certainties, all previous points of view. That can't be done completely, of course, but the key is to develop the arts of sympathy that allow one to see the world from many different points of view. The arts excel in teaching sympathy, of course, and part of their function is to enable us to escape our personal prisons of individuality. The Third Step involves "lying," in the sense that we must take on different roles, personae, and assumptions temporarily to see what the world looks like under those limits and conditions—in other words, "make believe," the willing suspension of disbelief. All suppositions are fictional in some sense, because suppositions are limits on what is essentially unlimited. When we "lie" under philosophical conditions, we don't commit an ethical transgression, we develop the art of seeing ourselves as others see us and of standing in others' shoes.

In Other Words . . .

Look forward to, and cultivate proper forms of, confusion. Learn to distinguish between personal and educational unpleasant states. Regard learning as both active and collaborative. And, above all, stop blaming others for your confusion. Confusion should not be used to endorse, confirm, authenticate, or include. Object to the gross simplification of schooling to make everyone "feel good about themselves." The only way we really feel good about ourselves is if we are capable of learning on our own, sympathizing with others, and enduring confusion in order to grow intellectually.
21 February 2008

20 February 2008

Thursday Game Plan

Remember that your new prime section is due tomorrow at the beginning of class. You MUST bring work materials to class tomorrow. You should have several sheets of 18x24 vellum, a drafting/mechanical pencil or lead holder with 6h lead, a t-square, a triangle/adjustable triangle, drafting tape, a drafting eraser, an eraser shield, and a compass. We must work! You must draw well!

See you tomorrow.

18 February 2008

Quote of the Week

The painter starts with the real world and works toward abstraction...But architecture takes two lines. The architect starts with the abstract world, and due to the nature of her work, works toward the real world. The significant architect is one who, when finished with a work, is as close to the original abstraction as she could possibly be...and that is also what distinguishes architects from builders.

17 February 2008

Due on Tuesday


Combine the individual cube models into one model.
Combine the individual blob models into one model.

There are several examples of the wire combine models in the left column of this blog along with the two images posted above. We suggest you look here for examples of how others have joined these individual models together.

Bring the combined cube model and the combined blob (fiat) model to class on Tuesday completed and ready to photograph.

And yes soldering is allowed.

14 February 2008

Happy St-Valentine's Day

Today will be a work and review day to continue on with the models. We need to take some pictures and start combining them together.

I hope you all understand that the work is starting to get more intellectual and content rich in these next assignments.
I think you do because ALL the questions you all are bringing up about the relationship between the forms and objects of your room and the movement that occurs in it are right on. Time, especially as a part of movement, is as important a subject in today's architecture as "timelessness" was in the architecture of 100 years ago. We build things in time as much as we do with bricks and mortar.

In his book Matter and Memory, Henri Bergson presents a radical understanding of what movement is and what relationships can be drawn between movement and matter. Bergson was very much affected by the collapsed movement in the time-motion photographies of E.J. Marey and Edward Muybridge. He also was impacted by a contemporary who was writing about the relationship between space and time, Albert Einstein. For Bergson there are two ways to measure or quantify movement:
1. in the relative terms of a geometer (things measured according to something beyond the action).
2. in the real terms of a physicist (things measured according to conditions internal to the event or action).

Imagine how these guys relate space and movement.

Notes on Grades

Today we'll give back your first grades. There are not many A, D, and F level grades but there are as many Bs as Cs. Please keep some perspective on this grade. Notice the point totals you have been assigned. You are a great class to teach and Marti, the TAs and I are all really focused on teaching you because you are kindly and respectfully responding.

There were about 208 of you who submitted work for a grade.
There are only about 30 of those who have a failing grade (15% of the class).
There are about 30 of you who have an A, A-, and B+ grade (15% of the class).
The average grade is between a C+ and a B-.
About 40 people who started with us did not submit for a grade and have quit the course.

Notes for students who made an F or D:
Almost all the failing grades have a missing assignment(s), excessive absences, late work, and / or consistently bad craft on all the exercises.If your grade is a D or an F you should either re-think the way you are completing the assignments or you should drop the course. Something you are doing is not letting you show us that you know the course content through your work.
Maybe this is not the time for you to be taking a time consuming performance based course? You have to have time to do things in this class to learn the content. Maybe you have something else you'd rather be studying? This subject and method is not for everyone.

Notes if you have a C-, C, C+, B-, or B level grade:
You almost certainly fall into one of two groups:
1) People with consistent C level grades who have done everything almost good enough and nothing particularly well in the exercises. Your work is average usually because you've not adjusted to making the work a form of inquiry and exploration of the subject matter, you're not focusing on the work and craft of the exercise, and are not "making the work your own"- taking authorship for your efforts. Typically, you have respectable discipline but are not risk takers.
2) People with a range of grades on their assessment sheets, some with flashes of brilliance and promise, an A / B or two here or there tempered by late submissions and / or other assignments that you did badly on. You usually lack discipline and are risk takers. You sometimes pour yourself into the work but run hot and cold.
You have to ask yourselves:
How can I take this to the next level? What does each box on the assessment sheet mean in literal terms? How are my projects NOT like the ones displayed in the hallway? Some of you may not be engaged by the subject matter and are looking forward to seeing if the next course engages you further. Some of you may have other priorities in life right now and you can only afford this much effort. We respect that priority but we aren't going to ignore the lack of evidence of learning in your work.

Notes if you have a B+, A-, or A level grade:
You've worked diligently so far and have shown a high level of craft and conveyance on multiple exercises. To continue at this level you'll have to be self-critical and ask yourselves what skills, habits, and approaches to the material got my work recognized in this first five weeks? You'll need to build on them to continue. What is it that we're seeing in your work? You have to learn that by looking at what other students who are doing well are doing and compare then to your own efforts.
You've done very well in the first assignment.
What did you do that got your work recognized for being good?
I wasn't that smart in first year but I did know that all that time and attention paid off in ability and knowledge. Keep up the great work!

Issues with Grading:
A question about our assessment has to be specific. You cannot say, "I don't understand the grade I got." We won't answer that charge. You haven't assessed the work yourself so you haven't tried to understand it.
Here's how you can assess your own work:
#1) Compare your work to the work exhibited in the hallway as excellent. How is it different? How is it the same?
#2) Write down how you think you did. We'll post the grading sheet template. Fill out your own version for each category. What grade do you think you deserved?
#3) Sit down during office hours with any TA, your assessment, and our assessment. How is it different? What are the categorical differences in the way we're talking about it?
#4) If you still have an issue with your grade then you will write out your concern in terms of how you understand the system we've used to grade you and how we've deviated from that system. Once you've written that out you can submit it to me via email for review and comment.
We've graded about 1,248 items and made 208 grade summaries. Certainly, we might have a few mistakes in all that work but we've been very diligent and have used a number of checks and balances in the assessment process.

10 February 2008

Photo of the Week: Alphabet Sky

One of the great things about design and architecture is that it is historically a path for both intellectual, creative, and financial mobility in our society. You can start in architecture school at a community college and; if you've got acumen, intellect, and curiosity; can be enticed to finish at whatever school you want to go to. This is a good place to study architecture but you should be good enough to succeed anywhere in architectural school. I started at UT-Arlington and finished my education at Columbia. I like to move.

It is part of the lore of these programs that we send some of our very best students to the very best schools for their final professional years or for post-professional work. Some of us see this as a way of validating and promoting our college. In addition to the great students who study here for an M.Arch. there are students who have graduated in the last three years who are in Princeton's graduate program (2 of them), Rice's graduate program (3 of them), UPenn (2 there), Yale, Clemson, Columbia, Pratt, California College of Arts and Crafts, and UCLA.

There are 23 students from the college that I know of this year who are applying to other schools to continue their studies after either a B.Sc. degree or a professional M.Arch. They are applying to the best programs in the country- Harvard, Berkeley, UCLA, Cranbrook, Yale, Rice, UMich, UMinn, Clemson, Princeton, SCI-Arc, MIT, Cornell, Penn, and RISD.

This picture is part of a project by an architecture student at Yale. She took pictures of the sky through buildings to make the alphabet. It should be a font.

I only tell you all about these people because it is exciting to see some of you really excel in your work and I want to encourage you by pointing out what you all ae earning in this degree program. You're studying for a professional program. If trends hold, in three years about 60 of you will graduate with a B.Sc.Arch. (pre-professional) degree. In four or five years 40 of you will graduate from our college with a professional master's degree. In three or four years 3 to 10 of you will be studying at Ivy League schools. Any of those accomplishments are exceptional and few people work hard enough or study enough to be literate in architecture culture, to understand the discipline of architecture, and to be a licensed professional in our society. A focused, articulate, architect / designer is a status, responsibility, and a privilege that can't only be measured in pay scale. It does take work. You've really got to like this sort of study or this will be an unbearable haul to get a degree in something you do not enjoy actively doing. It is an honor to get to watch your careers, no matter where you all go, unfold. You'll be a memory here before you know it even if you stay as long as you can.

John, if you're out there, and I hear you are, give us a comment on this post's subject matter or just tell us about what's going on in New Jersey.

08 February 2008

Attention

I M P O R T A N T I N F O R M A T I O N

The wire models should be completed at a 1" = 1'-0" scale, not at 1/2" = 1'-0"!!!

A G A I N W I R E M O D E L S A T 1 " = 0 ' S C A L E

03 February 2008

Building of the week (18 years ago)

HOTEL and CONVENTION CENTRE in AGADIR by REM KOOLHAAS
Agadir, Morocco, 1990 (Competition)

Rem Koolhaas was born in 1944. After having lived in Indonesia between 1952 and 1956, he settled in Amsterdam as a journalist for the Haagse Post and as a film screenplay writer, before leaving for London to study architecture at the Architectural Association School. Two theoretical projects come from this period: The Berlin wall as architecture(1970) and Exodus, or the voluntary prisoners of architecture(1972).

A scholarship obtained in 1972 allowed him to stay in the United States, where, fascinated by New York, he started to analyze the impact of metropolitan culture on architecture and published Delirious New York, a retroactive manifesto for Manhattan.

At this stage, Rem Koolhaas wanted to progress from theory to practical application and decided to return to Europe. In London in 1975, he created, with Elia and Zoe Zenghelis and Madelon Vriesendorp, the Office for Metropolitan Architecture(OMA), whose objectives were the definition of new types of relations —theoretical as well as practical— between architecture and the contemporary cultural situation.

Modeling Events

If you are using foam and you want to try a model without pins you may choose to purely subtract from the foam to represent your ideas and concepts. You are diagramming information on these models. You are also welcome to sculpt both sides of the foam if you find a use for this technique. Craft is important in these models so if you are sculpting the foam use the correct tools and sand to finish.

Important craft issues ::

Sand off any black markings that may be on the face of your foam before you commence your work.

Sand foam with a fine grit to finish (models should be smooth).
If stacking the foam because you have smaller than 2 in foam, use Aileen’s tacky glue (gold bottle) and spread evenly between the two layers, apply pressure (stacking books on top), and wait for it to dry. Follow by sanding the layers smooth.
When using paper you may choose to stack two pieces of paper together, but never use glue.

If you are having troubles finding pins, try any craft store, varsity, target, kmart, rendr ect....they are there somewhere. If you are still having troubles get some piano wire with a diameter from .020” to .032” and cut it to your desired length. You will need wire cutters, this wire is tough and rigid.

Bring models on Tuesday so we can discuss any issues you are having. It is a work day, so you are required to bring work. You will not be allowed to just simply sit at your desk, there is always something to work on. In the following years you will have one studio per semester and you will be required to work for four solid hours. We are asking for two so get to work. Bring questions and concerns and we will all see you on Tuesday. This is the last day to ask any questions before we begin grading on Thursday.

Remember your official due date for all of this material is Thursday February 7. This day will be a pin up day so be prepared to have all your assignments collected, fixed, and ready to pin up.

Things to pin up on Thursday ::


Photo Mosaic

One Extensive List
One Duration List
Four Extensive Chart/Graphs
Four Duration Chart/Graphs
Four Profile Knives
Three Profile Sections of your room each on its own 24 by 24 sheet of Vellum
One Isometric drawing of your three sections projected at 45/45 on own 24 by 24 sheet of Vellum
15 Chronophotography Prints (use a consistent format no smaller than 3 by 5, do not crop images)
Three Event Models

Make sure to have plenty of binder clips and pins for hanging your work.

29 January 2008

Building of the Week


The Polish Pavilion for the 2010 World's Fair in China. The design was selected in an open design competition from over 300 entries.

27 January 2008

Chronophotography

Bring your camera to class on Tuesday. You need to be able to manipulate your shutter speed on your camera. If you do not have a camera, you should find a partner as soon as possible that is willing to share. You will need a partner to do this assignment.

The chronophotography assignment follows the projection drawings of your room. It will be due on Tuesday February 5. This should give you ample time to either check out one of the few cameras they have upstairs (the SLRs from Denny or the commercial grade digital cameras from Johnny) and or to develop your images if you decide to use a 35mm film camera. Remember if you develop your film get Matte prints not glossy! There are 200 of you, so be kind and return the cameras as soon as you are finished.

You should perform at least 15 events in your room for this assignment. It will take a couple of tries to get to know the technology. You will need to experiment with the effects of chronophotography. Do not rush this, we are giving you this time to have fun and create something beautiful. There are many ways to do this. But you are the creator. You can flash the room with a single on and off switch during the shot, use single light records (single LED lights on both hands are an example of this technique), or you could use draped lighting (white christmas lights are an example of the drape effect).

You will find more details in the assignment located in the left column of this blog.

24 January 2008

Step by Step Process for Projecting


(click on image to start animation and ignore the last step so that you leave all work)

22 January 2008

ERASED DEKOONING

In lecture tonight we'll talk about Robert Rauschenburg's Erased DeKooning. Rauschenburg is a Texan, of course. DeKooning was a Dutch master of abstract expressionist painting. In 1959 Rauschenburg was a young punk in NYC. Rauschenburg asked the master DeKooning for a drawing. Rauschenburg took the drawing home, erased the whole drawing, and retitled the piece Erased DeKooning.

In an interview with art critic Calvin Tomkins, Raushcenberg said: "I had been working for some time at erasing, with the idea that I wanted to create a work of art by that method. Not just by deleting certain lines, you understand, but by erasing the whole thing. Using my own work wasn't satisfactory . . . I realized that it had to be something by someone who everybody agreed was great, and the most logical person for that was de Kooning. . . . finally he gave me a drawing, and I took it home. It wasn't easy, by any means. The drawing was done with a hard line, and it was greasy too, so I had to work very hard on it, using every sort of eraser. But in the end it really worked. I liked the result. I felt it was a legitimate work of art, created by the technique of erasing."